
Scikit Image is an image processing library in python. It is a huge collection of algorithms and available for free of cost. This library can perform a variety of complex image processing like denoising, color scheme changing, image stabilization, perspective correction, edge and contour detection, etc. There are many powerful techniques that can be using in manipulating image pixels. Being the first article in the series of image processing articles with Scikit Image, in this tutorial, we will start with the basics of changing the color spaces of images.
Color space indicates the color scheme used by that image. Most of the images are either in RGB (Red, Green, Blue) color space as in image 1 shown below.
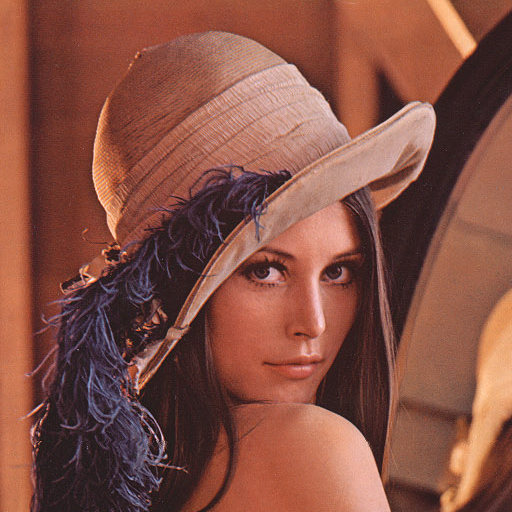
Interesting Fact: This image called the lena is one of the standard images used for image processing since 1973 and it is a picture of Lena Söderberg, shot by photographer Dwight Hooker. This appeared in the November 1972 issue of Playboy magazine.
Source: Wikipedia
We will use this as the testing image for the rest of the tutorial. all the color schemes or scales belong to the scikit’s color package. Before we get to the color schemes, we’ll define a way to read an image with scikit.
1. Read, write and show Image using scikit
Images in scikit are in the form of numpy arrays. You can use scikit to read an image as a numpy array, apply the algorithms and write the arrays back as an image. Use the following code to read/ write an image.
from skimage.io import imread
from skimage.io import imsave

# read the image
inp_image = imread("/home/akshay/lena.png")
# replace the path above with the absolute path of the image you want to read

#write image back to file

#parameter 1: path where the image has to be saved.
#parameter 2: the array of the image.
imsave("/home/akshay/new_lena.png",inp_image)
If the image is not in the form of integer values, it cannot be saved. This happens when you apply some thresholding or manipulating functions. In such a case, you will have to first convert the image values to integer and then save it. The following code will help you do just that:
from skimage import img_as_uint

imsave("/home/akshay/new_lena.png",img_as_uint(inp_image)) #img_as_uint is the secret to correctly save images that cannot be saved directly!!
you can also see the image that you have read of just about to write by calling the imshow method as shown below:
from skimage.io import imshow, show

imshow(inp_image,'matplotlib')
show()
# the 'matplotlib' is used to tell the viewer to use matplotlib plugin while plotting the image.
Now that we know how to read, write and see images programmatically, we can start with the techniques to change color scales.
2. RGB to Gray (or Grey)
The RGB is a 3 channel color scheme with Red, Blue and Green channels whereas the Gray or Grey is a 2 channel scheme.
from skimage.io import imread, imsave
from skimage.color import rgb2gray, rgb2grey

inp_image = imread("/home/akshay/lena.png")

img_gray = rgb2gray(inp_image) # rgb2grey(inp_image) can also be used

imsave("/home/akshay/lena_gray.png",img_gray)
the images below show the image before and after conversion
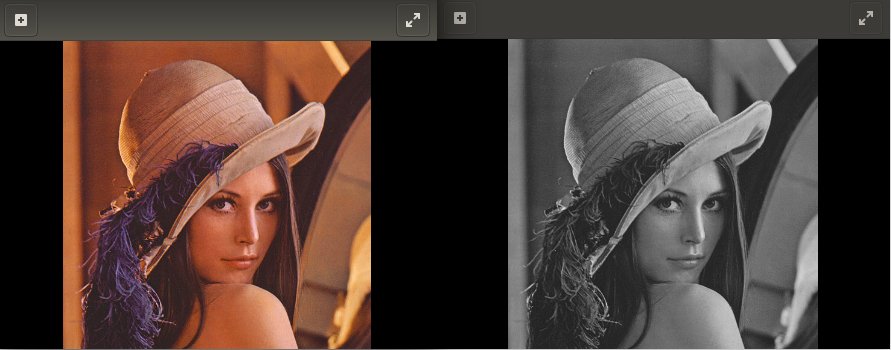
This technique is used as a pre-processing step in many image processing techniques like thresholding/ binarization. This is very useful when you do not need a 3 channel pixel like (120,140,30) for R, G, and B respectively but have just one value like (133) which represents the gray channel.
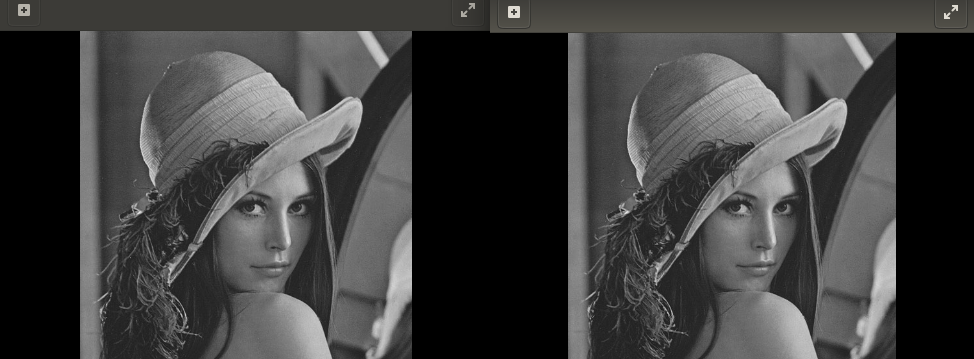
2. Gray (or grey) to RGB
There are cases when you have a single channel grayscale image and you want to convert into a 3 channel image, then it can be done by using the gray2rgb method of scikitImage. What you must understand is that this does not convert a grayscale image to color. that is a black and white image, remains black and white image after conversion. The only thing that changes is that, before the conversion happens, each pixel are represented as a single value, example: (120) and after conversion, it is represented in 3 channels. Example: (120,120,120). Thus, you will have an RGB image.
from skimage.color import gray2rgb

inp_img2 = imread("/home/akshay/lena_gray.png")
rgb_img = gray2rgb(inp_img2)
imsave("/home/akshay/lena_gray2color.png",rgb_img)
the images below are before and after applying the conversion. As you can see, there is no visual change.
3. RGB to HSV
HSV color space stands for Hue, Saturation, and Value. This is also called the HSI or HSB color space where ‘I’ indicates Intensity and ‘B’ indicates Brightness. The HSV color space is used a lot in the artists’ community or design community who want to understand and visually see the lighting intensity or the hue present in a given image. Some of the image processing tasks that rely on intensities need the image to be in the HSV color space. Here is how you can convert a RGB image to HSV.
from skimage.color import rgb2hsv

hsv_img = rgb2hsv(inp_image)
imsave("/home/akshay/lena_hsv.png",hsv_img)
The images below show the image before and after applying the filter:

4. Binarization or Thresholding
Binarization, a.k.a Thresholding refers to converting an image of any type to a binary image. Each pixel in a binary can be either black (0) or white(1). It is important to note that for binarizing an image, the image should be in grayscale first. So we start with a RGB image and then we convert it to grayscale before applying the thresholding to it.
from skimage.color import rgb2gray
from skimage.io import imread, imsave
from skimage.filters import threshold_otsu
from skimage import img_as_uint

inp_image = imread("/home/akshay/lena.png")
img_gray = rgb2gray(inp_image)

thresh = threshold_otsu(img_gray)
binary_thresh_img = img_gray > thresh

imsave("/home/akshay/lena_thresh.png", img_as_uint(binary_thresh_img))
You might have observed that while saving the image, we are using the “img_as_uint” method to save the thresholded image. This is done because, when the image has been binarized, it is in the form of non-integer values and thus cannot be saved. So by using the “img_as_uint” we are converting the image values to unsigned integers which can then be saved by scikitImage.
Following image shows the effect of applying the OTSU_thresholding on the image. Thresholding is used for many image based solutions like Optical Character Recognition, template recognition, etc.

One thought on “Manipulating image pixels with python scikit image – color schemes”