People generate tremendous amounts of unstructured data each day. We can derive a lot of insights from this data that can help businesses in various ways. It might help to improve sales or allow them to understand the needs and pain points of their customers. In this article, we will use IBM NLU (Natural Language Understanding) to perform product review sentiment analysis python
We will also perform emotion recognition and visualize this data to see how the product has been performing.
Please Note: You can sign up for IBM Cloud and use the IBM NLU feature for Free. So, give it a try!
Introduction to IBM NLU
The IBM Cloud Platform provides a solution to analyse text called the IBM NLU. It has capabilities to process various kinds of content like text, webpages, HTML strings and more. This service provides functionalities like sentiment analysis, emotion recognition, category and concept recognition, and entity extraction to name a few.
You can register to IBM cloud and deploy the IBM NLU service for free. You can register through this link: https://www.ibm.com/watson/services/natural-language-understanding/
Fill in the details and create the IBM NLU service for your account. Once the creation is complete, you will be able to see the service dashboard like in the image below.

You will need the API key as well as the URL to use the service and you must not share it with anyone else.
Defining the Dataset
let’s use the Amazon product review dataset provided by Datafinity hosted on Kaggle. This dataset consists of reviews for the Kindle Fire Tablet. Some of the key fields in this dataset are:
- Review Text
- Date of Review
- Review Title
- Review URL
And many more fields which we will not use for our use case.
Working with IBM NLU using Python SDK
IBM NLU supports a variety of programming languages like Python, Node, Ruby, Go and more. I am going to use the Py SDK because that is my favotire language and it’s very popular for machine learning projects.
Product Review sentiment Analysis Python is our task for the day. To begin, we start with installing the python dependency for IBM NLU. Use the following command to install the IBM Watson Cloud Library in python.
pip install --upgrade "watson-developer-cloud>=2.5.1"
We will be using this library to communicate with IBM NLU on the cloud and fetch the result of text analysis.
1. Data Preprocessing
The dataset that we have with us has reviews for Amazon products like the Kindle variants, and echo show devices, and more. The data preprocessing step involves cleaning up this data. We will be tackling the following steps as a part of data preprocessing.
1.1 Column Cleanup
We do not need all the columns in the dataset and so we will be keeping only the ones we need. I have identified that ID, device name, review text, and date of review are the only ones we need. We can get rid of the rest. We will be using the
pip install pandas
The following code does the cleanup and I have added comments to make it self explanatory.
import pandas as pd


def read_csv_file(file_path):
    """
    method to read a csv file and return an iterable object
    :param file_path: path to the dataset file
    :return: iterable object
    """
    # read the file and store it as a dataframe
    csv_iterator = pd.read_csv(file_path)
    # print the number of rows found in the file:
    num_rows, num_cols = csv_iterator.shape
    print(f"the number of rows found in file: {num_rows}")
    # print all the column headings
    print("column headings from raw dataset: ", list(csv_iterator.columns.values))

    return csv_iterator


def preprocess_data(dataset_file_path, features_included):
    """
    :param dataset_file_path: path to the dataset
    :param features_included: list of column names to keep. For example : ["name", "review.txt", "date"]
    :return: pandas dataframe containing clean data.
    """
    # read the dataset file
    csv_dataframe = read_csv_file(dataset_file_path)
    # keep only those columns which we need
    cleaned_frame = csv_dataframe[features_included]
    # check to see if the column names are what we wanted
    print("column headings from cleaned frame: ", list(cleaned_frame.columns.values))
1.2 Product Analysis
We aren’t certain as to how many products are present in the dataset. We would like to present the product review sentiment analysis Python as a function of time. In simpler words, we would like to show the seller, how people have reacted to the products with time.
If there are products which are very few in number, we will not have enough data to plot. So, let us analyze the products and the product count and determine if some of them have to be removed. We will be
pip install matplotlib
The code below performs aggregation on our cleaned
def get_distribution(dataframe, target_column):
    """
    method to find the distribution of a certain column in a given dataframe.
    Shows the generated visualization to the user.
    :param dataframe:
    :param target_column: column upon which the distribution needs to be applied
    :return: dictionary of unique values from target column and its count in the dataset.
    """
    # get the count of unique products in the dataset
    df_clean = dataframe[target_column].value_counts()
    print("number of unique products found: ", len(df_clean.values))

    # building a scatter plot to show the distribution of products
    x = df_clean.values  # the x axis shows the count of reviews per product
    y = np.random.rand(len(df_clean.values))  # y axis does not have any significance here. so setting random values
    z = df_clean.values # the size of each bubble in the scatter plot corresponds to the count of reviews.

    # use the scatter function to create a plot and show it.
    plt.scatter(x, y, s=z * 5, alpha=0.5)
    plt.show()

    # return the aggregation as a dictionary
    return df_clean.to_dict()
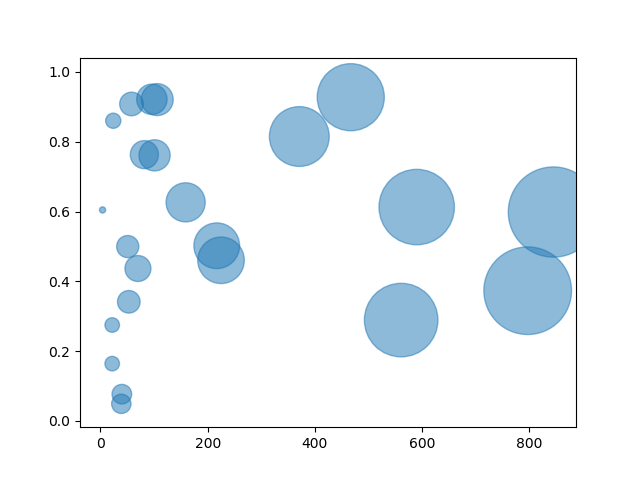
running this, we find that the dataset has reviews for 23 different products and following image shows the distribution.

If you observe the plots, there are products with over 800 reviews and some with 1 review. looking at this, we can make a decision to ignore products with less than 300 reviews.
1.3 Row cleanup
Now that we have identified the products to retain, let’s discard the others. The following code deletes rows from our cleaned dataframe when there is a match to a product with less than out fixed count (which is 300) . The following code deletes the rows from the dataframe where the product has fewer than 300 reviews.
# get the count of reviews for each product
distribution_result = get_distribution(cleaned_frame, "name")

# get the names of products who have more than 300 reviews
products_to_use = []
for name, count in distribution_result.items():
    if count >= 300:
        products_to_use.append(name)

# get only those rows which have the products that we want to use for our analysis
cleaned_frame = cleaned_frame.loc[cleaned_frame['name'].isin(products_to_use)]
1.4 Extract Individual product details
The final step in data preprocessing is to extract the product details individually and store them in a reverse chronological order. The code below extracts each product details and stores each dataframe in a dictionary.
# data structure to store the individual product details dataframe
    product_data_store = {}
    for product in products_to_use:
        # get all rows for the product
        temp_df = cleaned_frame.loc[cleaned_frame["name"] == product]
        # the date column is in string format, convert it to datetime
        temp_df["date"] = pd.to_datetime(temp_df["reviews.date"])
        # sort the reviews in reverse chronological order
        temp_df.sort_values(by='date')
        # store the dataframe to the product store
        product_data_store[product] = temp_df.copy()
2. Perform product review sentiment Analysis Python
We now have the data for each product. The next step is to perform text analysis using the IBM NLU Python SDK. As we discussed earlier, there are many types of results that the text analysis will return. We are interested only in sentiment analysis and emotion recognition.
The code below sends text to IBM cloud and gets the result from text analysis.
def perform_text_analysis(text):
    """
    method that accepts a piece of text and returns the results for sentiment analysis and emotion recognition.
    :param text: string that needs to be analyzed
    :return: dictionary with sentiment analysis result and emotion recognition result
    """
    # initialize IBM NLU client
    natural_language_understanding = NaturalLanguageUnderstandingV1(
        version='2018-11-16',
        iam_apikey='add_your_api_key_here',
        url='https://gateway-lon.watsonplatform.net/natural-language-understanding/api'
    )

    # send text to IBM Cloud to fetch analysis result
    response = natural_language_understanding.analyze(text=text, features=Features(
        emotion=EmotionOptions(), sentiment=SentimentOptions())).get_result()

    return response
Please note that you need to enter your API key in the code above for it to work. The snippet below shows a sample response that you can expect from IBM when you run the code above.
//text used: "I found this product to be amazing. I'm really excited to install and start using it!"
{
  "usage": {
    "text_units": 1,
    "text_characters": 85,
    "features": 2
  },
  "sentiment": {
    "document": {
      "score": 0.97421,
      "label": "positive"
    }
  },
  "language": "en",
  "emotion": {
    "document": {
      "emotion": {
        "sadness": 0.02729,
        "joy": 0.935641,
        "fear": 0.016841,
        "disgust": 0.003459,
        "anger": 0.004968
      }
    }
  }
}
From the result from IBM, as shown above, we can see that the system has identified the review to be “positive” (with a confidence score of .97 or 97%) and the emotion detected is “joy”(which a confidence score of .93 or 93%).
3. Aggregating Results
Once the base it set to perform text analysis ,we now need to aggregate the result for all reviews for a product. There is a chance that there might be more than one review on a given day. To handle this, there are multiple approaches we can use. However, for simplicity, we will find the average the values for the day to find the sentiment and emotion for that day.
We can maintain a dictionary with the date as the key and the sentiment value and emotion result as values. we will have one dictionary per product. This dictionary will also help us to combine the values and help us with the visualization. The code below works with the
def aggregate_analysis_result(product_dataframe):
    """
    method to analyse and aggregate analysis results for a given product.

    :param product_dataframe: preprocessed dataframe for one product
    :return:
    """

    # data structure to aggregated result
    product_analysis_data = {}

    count = 0
    print("shape of dataframe", product_dataframe.shape)
    # iterate through the reviews in the dataframe row-wise
    for row_index, row in product_dataframe.iterrows():
        print(count+1)
        count += 1
        review_text = row["reviews.text"]
        date = row["reviews.date"]

        # get the sentiment result.
        analysis = perform_text_analysis(review_text)

        sentiment_value = analysis["sentiment"]["document"]["score"]

        # emotion of the text is the emotion that has the maximum value in the response.
        # Example dict: {"joy":0.567, "anger":0.34, "sadness":0.8,"disgust":0.4}.
        # in the dict above, the emotion is "Sadness" because it has the max value of 0.8
        emotion_dict = analysis["emotion"]["document"]["emotion"]

        # get emotion which has max value within the dict
        emotion = max(emotion_dict.items(), key=operator.itemgetter(1))[0]

        # check if review on date exists. if yes: update values, if no: create new entry in dict
        if date in product_analysis_data:
            product_analysis_data[date]["sentiment"].append(sentiment_value)
            product_analysis_data[date]["emotion"].append(emotion)
        else:
            product_analysis_data[date] = {}
            product_analysis_data[date]["sentiment"] = [sentiment_value]
            product_analysis_data[date]["emotion"] = [emotion]

    # find the average sentiment for each date and update the dict.
    for date in product_analysis_data.keys():
        sentiment_avg = sum(product_analysis_data[date]["sentiment"]) / len(
            product_analysis_data[date]["sentiment"])

        product_analysis_data[date]["sentiment"] = sentiment_avg

    return product_analysis_data
Following is the sample output for one the product after aggregating the result. You can see that each date has the average sentiment value as well as one or more emotions recognized on that day.
//length of analyzed result:  140
{
  "2016-12-15T00:00:00.000Z": {
    "sentiment": 0.760527,
    "emotion": [
      "joy",
      0.687403
    ]
  },
  "2017-06-21T00:00:00.000Z": {
    "sentiment": 0.32292733333333334,
    "emotion": [
      "joy",
      -0.591176,
      0.604589
    ]
  },
  "2016-10-07T00:00:00.000\r\nZ": {
    "sentiment": 0.6609746666666666,
    "emotion": [
      "joy",
      0.834256,
      0.300851
    ]
  },
...
}
4. Python Data Visualization
Now that we have our aggregated result, we can now proceed with visualizing he data and see what the customers have been feeling about the product. We will use the “matplotlib” library to build plots and display them.
We would be building two types of plots. One will be a line plot which will display the sentiment across time. The second one will be a pie chart that shows the various emotions that people have expressed for the product.
The code below generates a line graph using the aggregated result.
def visualize_sentiment_data(prod_sentiment_data):
    """
    takes in the sentiment data and produces a time series visualization.
    :param prod_sentiment_data:
    :return: None. visualization is showed
    """
    # to visualize, we will build a data frame and then plot the data.

    # initialize empty dataframe with columns needed
    df = pd.DataFrame(columns=["date", "value"])

    # add data to the data frame
    dates_present = prod_sentiment_data.keys()
    for count, date in enumerate(dates_present):
        df.loc[count] = [date, prod_sentiment_data[date]["sentiment"]]

    # set the date column as a datetime field
    df["date"] = pd.to_datetime(df['date'])
    # convert dataframe to time series by setting datetime field as index
    df.set_index("date", inplace=True)
    # convert dataframe to series and plat it.
    df_series = pd.Series(df["value"], index=df.index)
    df_series.plot()
    plt.show()
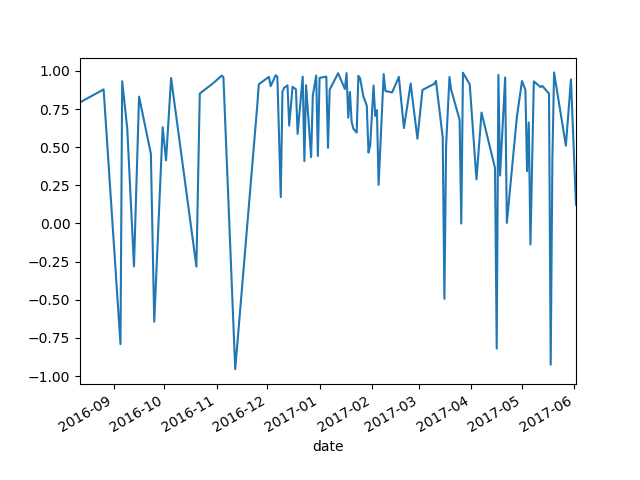
The method above generates visualizations on sentiment across time. Positive values are shown as positive numbers, higher the values more positive is the customer sentiment and vice-versa. The image below is an example plot generated using the code above for an Amazon Kindle device.

We can infer quite a few things from the image above. Firstly, the overall sentiment is quite positive, but there is no shortage of people who are extremely displeased with the product. This is just a simple plot. We can do a lot more analysis to gain more insights.
The code below builds visualization using the emotion data that we have fetched using IBM NLU.
def visualize_emotion_data(prod_emotion_data):
    """
    method that takes in emotion data and generates a pei chart that represnts the count of each emotion.
    IBM provides data for 5 types of emotions: Joy, Anger, Disgust, Sadness, and fear
    :param prod_emotion_data:
    :return:
    """
    # data structure to hold emotions data
    prod_emotions = {}

    for key in prod_emotion_data.keys():
        emotions = prod_emotion_data[key]["emotion"]

        # update emotion count in the emotions data store
        for each_emotion in emotions:
            if each_emotion in prod_emotions:
                prod_emotions[each_emotion] += 1
            else:
                prod_emotions[each_emotion] = 1

    # define chart properties
    labels = tuple(prod_emotions.keys())
    sizes = list(prod_emotions.values())

    # initialize the chart
    plt.pie(sizes, labels=labels, autopct='%1.1f%%',shadow=True, startangle=90)
    plt.axis('equal')  # Equal aspect ratio ensures that pie is drawn as a circle.
    plt.show()
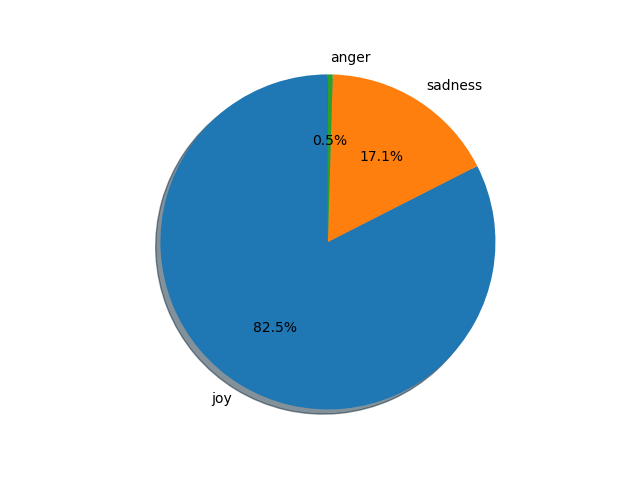
Following is the chart generated for the Amazon Kindle device using the code above. It shows the emotions that people have had while using the device. IBM NLU is capable of identifying 5 emotion types: Anger, Joy, Sadness, Fear, and Disgust. Obviously, not all the products will have all kinds of emotions, but we can see the ones that the people have expressed.

We can see that “joy”has been expressed by most customers. However, there is a significant amount of people who are “sad” with the purchase. We haven’t used the emotion strength that has been provided. We could use that to gain more insights such as why exactly did they have that emotion and was it strongly emotional or mildly emotional.
Conclusion
What we have done so far is just the tip of the iceberg. IBM NLU has a lot more functionalities that you can explore for free. We have explored Product review sentiment analysis python
You can apply these principles to any other use case that you might have to build.
If you are interested in text classification, you can read more about it on my other tutorial Tensorflow Text Classification
Do you need any help on building your software? or if you want to share your thoughts on Natural Language Understanding, feel free to share them in the comments below.
Here is the link to the entire working code: https://github.com/sourcedexter/IBM-NLU


This is a great article. Exactly what I wanted.
Thanks for sharing!
Overall an awesome website.
Thank you very much!